Download the PDF with full instructions and diagrams here.
With Australia Day only a few weeks away, this is the perfect time to create a delightful embroidery that will pay homage to your countrys exquisite landscape. Designed by Fiona Tully of Two Brown Birds especially for Homespun, this Aussie-proud project will surely be a talking point in your home when friends and family come to visit. Or why not create it for someone special residing overseas to remind them of the beauty of our unique country.
Materials
29 x 38cm (11½ x 14½in) pale beige spot print fabric (stitchery background)
10cm (⅛yd) beige tone-on-tone floral print fabric (Border 1)
30cm (⅜yd) medium coffee brown watermark print fabric (Border 2)
DMC Stranded Embroidery Cotton in Drab Brown (611), Very Dark Beaver Grey (645), Light Old Gold (676), Medium Old Gold (729), Dark Topaz (782), Medium Topaz (783), Dark Khaki Green (3011), Light Khaki Green (3013), Dark Green Grey (3051), Dark Pine Green (3362), Medium Pine Green (3363), Pine Green (3364), Dark Shell Pink (3721), Dark Mocha Brown (3781), Light Mocha Brown (3782), Dark Brown Grey (3787), Ultra Dark Beige Grey (3790) and Medium Mocha Beige (3863)
Size 7 embroidery needle
20cm (8in) embroidery hoop (optional)
Derwent Studio pencils in Juniper Green (42), Cedar Green (50), Olive Green (51), Bottle Green (43), Vandyke Brown (55), Copper Beech (61) and Gunmetal (69)
29 x 38cm (11½ x 15in) fusible interfacing
29 x 38cm (11½ x 15in) freezer paper
3B pencil and water-erasable fabric-marking pen
Wooden frame with 42 x 51cm (16½ x 20in) opening
Rotary cutter, ruler and cutting mat
Sewing machine with ¼in foot
General sewing supplies
A copy of Homespun Vol 12 No 1
Finished size: 20.5 x 29cm (8 x 11½in) (stitched area); 42 x 51cm (16½ x 20in) (framed)
Stitches used: Back stitch, French knot, satin stitch, straight stitch
Note: Please read all instructions before commencing the project. Careful and accurate cutting and sewing are essential to ensure success with this project. A seam allowance of ¼in is included throughout unless otherwise stated. It is recommended that fabrics be 100% cotton, pre-washed and well ironed. Requirements are based on fabric 112cm (44in) wide. All embroidery is worked with two strands of thread unless otherwise stated.
Preparation and cutting
1. To find the centre of your background fabric, fold the 11½ x 14½in pale beige spot print rectangle in half horizontally, wrong sides together, and press. Fold it in half vertically and press. Open out the fabric and centre it over the stitchery design printed on the pattern sheet in Homespun Vol 12 No 1.
2. Lightly trace the design onto the fabric using the pencil or fabric-marking pen. A light source such as a window, light box or glass-topped table with a desk lamp placed underneath will help to make the design more visible through the fabric.
3. Fuse the interfacing to the wrong side of the background fabric. Place a cloth over the fabric and use lots of steam to fuse them together.
4. From the beige tone-on-tone floral print fabric, cut:
Two strips, 1½in across the width of the fabric. Crosscut them to yield two strips, 1½ x 13in and two strips, 1½ x 14½in.
5. From the medium coffee brown watermark print fabric, cut:
Two strips, 5in across the width of the fabric. From each strip, cut one strip 5 x 16½in and one strip, 5 x 22½in.
Embroidery
6. Place your work in the embroidery hoop, if desired, to keep it flat and prevent it puckering. Stitch the embroidery design through the fabric and interfacing, referring to the stitchery guide. Stitching through the interfacing allows for knots and small jumps between stitches to be hidden.
Stitchery guide
Design area |
DMC Stranded Embroidery Cotton
Stitch
Gum branch
Small gum leaves
Pine Green (3364)
Back stitch
Large gum leaves
Dark Green Grey (3051)
Back stitch
Gum blossoms
Dark Shell Pink (3721
Straight stitch
Gum blossom pollen
Medium Topaz (783)
French knot two wraps
Gum nuts (green)
Dark Khaki Green (3011)
Back stitch outline, then filled in with back stitch
Gum nuts (brown)
Medium Mocha Beige (3863)
As for gum nuts (green)
Wattle leaves
Dark Khaki Green (3011) and Dark Pine Green (3362)
Back stitch
Wattle blossoms
Light Old Gold (676) and Medium Old Gold (729)
French knot two wraps
House
Gum tree canopy
Medium Pine Green (3363)
Back stitch
Tree trunk
Drab Brown (611)
Back stitch
Grass
Light Khaki Green (3013) and Medium Pine Green (3363)
Straight stitch
Roof
Very Dark Beaver Grey (645)
Back stitch
Verandah posts and base of house
Ultra Dark Beige Grey (3790)
Back stitch
Windows and door
Drab Brown (611)
Back stitch
Wrought iron lace arches
Light Mocha Brown (3782)
Back stitch
Windmill stand and centre of blades
Dark Brown Grey (3787)
Back stitch
Windmill blades
Very Dark Beaver Grey (645)
Back stitch
Poem
Wording
Dark Mocha Brown (3781)
Back stitch and French knot two wraps
Colouring
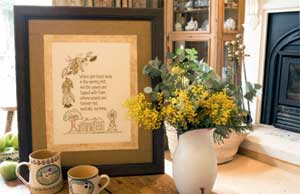
11. Centre the freezer paper on the wrong side of the embroidered panel and fuse the shiny side to the panel. This will help to stabilise the fabric as you colour. Referring to the photograph, colour your design according to the table below.
12. Before colouring, test your pencils on a scrap of fabric cut from the same background fabric you are using. Make sure your pencils are sharpened to a fine point to reach into smaller corners.
13. Start by outlining shapes inside the stitched lines, then fill the shapes with lighter shading, adding heavier shading in feature areas. Use a circular motion as you colour to apply the pencil and build up pressure against the surface to slowly achieve the depth of colour that you desire. As this project is framed and not intended to be washed, there is no need to use a textile medium.
Colouring guide
Design area |
Derwent Studio pencils
Gum leaves
Juniper Green (42)
Wattle leaves
Cedar Green (50) and Olive Green (51)
Gum tree canopy
Bottle Green (43)
Tree trunk
Copper Beech (61)
Roof and windmill blades
Gunmetal (69)
House
Vandyke Brown (55)
Finishing
14. Sew the 1½ x 14½in beige tone-on-tone floral print strips to the left and right edges of the embroidered panel and press seams outwards. Sew the 1½ x 13in beige tone-on-tone floral print strips to the top and bottom edges of the embroidered panel and press seams outwards.
15. Repeat step 14 with the medium coffee brown watermark print strips.
16. Frame as desired, centring the stitched area inside the frame opening. This piece was framed by Fiona using a dark brown rustic wooden frame.
For more information on other charming designs by Fiona Tully of Two Brown Birds, email