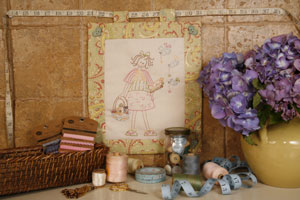
Little Miss Bizzi Buttons is ever so busy and she has her busy bluebirds helping out during her busy shopping spree. This wonderfully whimsical stitchery, designed by Philippa Morris of Whiskers and Wings, will delight all stitchers as it playfully demonstrates how an extra pair of hands (or wings in this case) can be ever so helpful. Have fun stitching this charming design for yourself or as a special gift for a crafting buddy.
Materials
26cm (10in) square cream seeded homespun (stitchery background)
30cm (3/8yd) green paisley print fabric (border, hanging tabs and backing)
Thin fusible batting such as Pellon at least 60 x 80cm (24 x 32in)
DMC Stranded Embroidery Cotton in Black (310), Light Avocado Green (470), Pale Yellow (744), Very Dark Hazelnut Brown (869), Medium Rose (899), Light Desert Sand (950), Ultra Very Light Dusty Rose (963), Light Peacock Blue (3766) and Very Dark Straw (3852)
Embroidery needle
20cm (8in) embroidery hoop (optional)
Four 25mm (1in) avocado green ceramic heart buttons (border)
Two 6mm (1/4in) pink buttons (basket)
Water-erasable fabric marking pen
Rotary cutter, ruler and mat
Sewing machine and 1/4in foot
General sewing supplies
Finished size: 26.5 x 31cm (10 1/2 x 12 1/4in), excluding hanging tabs
Stitches used: Back stitch, detached chain (lazy daisy) stitch, French knot, running stitch, satin stitch, straight stitch
Note: Please read all instructions before commencing the project. Careful and accurate cutting and sewing is essential to ensure success with this project. A seam allowance of 1/4in is included throughout. It is recommended that fabrics be 100% cotton, pre-washed and well ironed. Requirements are based on fabric 112cm (44in) wide. All embroidery is worked with two strands of cotton unless otherwise stated.
Preparation and cutting
1. From the cream seeded homespun, cut:
One rectangle, 8 x 10in (stitchery background).
2. From the green paisley print fabric, cut:
Two strips, 2 x 8in (border)
Two strips, 2 x 14in (border)
Two rectangles, 4 x 5in (hanging tabs).
3. From the fusible batting, cut:
One rectangle, 8 x 10in (stitchery background)
Two strips, 2 x 8in (border)
Two strips, 2 x 14in (border).
Embroidery
4. Find the centre of your background fabric by folding the fabric in half and then half again. Find the centre of the design on the pattern sheet and match it to your fabric centre. Using the fabric marking pen, lightly trace the stitchery design onto the cream seeded homespun rectangle. A light source such as a window, light box or glass-topped table with a desk lamp placed underneath will help to make the design more visible through the fabric.
5. Fuse the batting to the back of your rectangle and place your work in the embroidery hoop, if desired, to keep it flat and prevent it puckering. Working with an embroidery hoop or frame makes it easier to keep the tension even. Do not leave your embroidery in the hoop when youre not working on it as it may leave creases that are difficult to remove. Work the embroidery through both layers, referring to the stitchery guide below.
6. Once you have finished stitching, remove the fabric from the hoop and spray it with water to remove any visible pen marks. Press well. Referring to the photograph as a guide, sew the two 1/4in buttons in place on the basket.
Assembly
7. Fuse the batting strips to the wrong side of the border strips. Sew a 2 x 8in green paisley print strip to the top and bottom edges of the stitchery panel and press seams outwards. Sew a 2 x 14in green paisley print strip to the left and right edges of the stitchery panel and press seams outwards.
8. Cut one rectangle the same size as the quilt top from the remaining green paisley print fabric (for the backing) and the remaining batting. Fuse the batting to the wrong side of the backing fabric.
9. Sew the quilt top and backing fabric, right sides together, around all edges, leaving a small opening for turning. Turn the wallhanging right side out and press carefully. Slip stitch the opening closed.
10. With right sides of the tab rectangles facing, fold them in half and sew lengthwise along the edges. Turn the tabs right side out and press. Top stitch along the edges of both sides.
11. Fold each strip in half and stitch a 1/4in seam at the bottom. Turn them right side out and press with the seam at the bottom. Slip stitch the tabs onto the back of the wallhanging, making sure they are placed evenly along the top edge.
12. Referring to the photograph as a guide, sew the four ceramic heart buttons in each corner, making sure you position them evenly.
For more information on other whimsical designs by Philippa Morris of Whiskers and Wings, write to 6 Strehlow Place, Flynn ACT 2615, phone (02) 6258 9135, email whiskers.wings@optusnet.com.au or visit the website at www.whiskersandwings.com.au