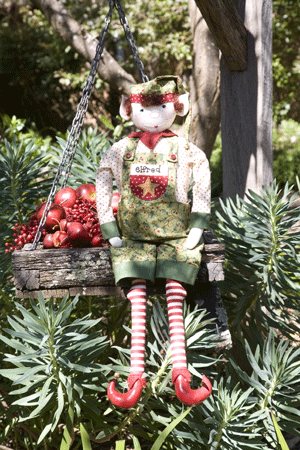
If only this little elf could talk, hed be sure to tell you everything hes been up to whilst creating toys in Santas workshop. This fun-loving character, designed by Jenny Stephenson of Jennabelle Designs, is dressed up for the festive season with his hat and boots adorned with jingling gold bells, but keep him away from small children unless you omit the buttons and bells as they could be a choking hazard.
Materials
Elfred1
Elfred2
Elfred3
Elfred4
Elfred5
Elfred6
30cm (⅜yd) quilters muslin (head, body, arms and ears)
40cm (½yd) red stripe print fabric (legs)
40cm (½yd) green holly print fabric (overalls and hat)
30cm (⅜yd) cream star print fabric (shirt)
20cm (¼yd) green mini check print fabric (cuffs)
15cm (¼yd) red star print fabric (pocket and hat trim)
20cm (¼yd) burgundy felt (collar and boot cuffs)
Scraps of beige homespun and mustard check print fabric (pocket trim and appliqué)
DMC Perlé No 8 Cotton in Black (310)
DMC Stranded Embroidery Cotton in Very Dark Shell Pink (221), Baby Pink (818) and Dark Straw (3820)
DMC Crochet Cotton in Ecru
Strong thread
Embroidery needle
Doll needle
Twice As Nice Wool Wave hair in Auburn
Three 10mm (⅜in) burgundy buttons (overalls)
Three 12mm (½in) gold bells (boots and hat)
Nine 3mm (⅛in) gold beads (collar and boot cuffs)
Plaid FolkArt Acrylic Paint in Christmas Red
Paintbrush
Masking tape (optional)
PVA glue
Scrap of double-sided fusible web
Polyester fibre fill
Stuffing tool or chopstick
Hot glue gun and glue sticks
Cosmetic rouge and brush
Pink lip pencil
Pinking shears (optional)
Pencil and thin cardboard
Sewing machine
General sewing supplies
Finished size: 65cm (25½in)
Stitches used: Back stitch, blanket stitch, French knot, ladder stitch, satin stitch
Note: Please read all instructions before commencing the project. Careful and accurate cutting and sewing is essential to ensure success with this project. Seam allowances have not been included in any of the patterns. It is recommended that fabrics be 100% cotton, pre-washed and ironed. Requirements are based on fabric 112cm (44in) wide. Use a smaller than normal stitch on your sewing machine for stitching the body as this makes the seams stronger and smoother.
Preparation
1. To make templates for each of the shapes, print out the pages, trace the pieces onto paper, transferring all markings, and cut them out ready for use. Note that some patterns are in two parts, joined at the dotted lines. Glue the pattern pieces onto thin cardboard, as this provides a sturdier template to trace for accurate construction. Cut the cardboard shapes out on the lines.
Body
2. Fold the quilters muslin in half, right sides together. Using the pencil, trace the head and body once and the arm and ears twice, leaving at least 1cm (½in) between the shapes.
3. Pin the two layers of fabric together, and cut the head/body shape out about 6mm (¼in) outside the traced line. Lay one of the shapes over the head/body shape printed on the pattern sheet (the fabric will be 6mm/¼in larger all round). Lightly trace the face details using the pencil. A light source such as a window, light box or glass-topped table with a desk lamp placed underneath will help to make the design more visible through the fabric.
4. To embroider the face, work the eyes with French knots and add back stitch for the eyelashes using Black (310). Work the nose and the mouth in back stitch using three strands of Baby Pink (818). Satin stitch the mouth using three strands of Very Dark Shell Pink (221). Put the head/body shapes to one side.
5. Stitch around the arm and ear shapes on the traced lines, leaving the openings marked on the patterns. Cut them out about 6mm (¼in) outside the stitching and turn them right side out.
6. Fold the red stripe print fabric in half, right sides together and long edges and stripes matching. Using the pencil, trace the leg twice, leaving at least 1cm (½in) between the shapes. (The printed stripes on the fabric should run across the legs.)
7. Stitch around the legs on the traced lines, leaving the tops open as marked on the pattern. Cut the shapes out about 6mm (¼in) outside the stitching and turn them right side out.
8. Lightly draw a line on each ear, referring to the pattern for guidance; the line should be on the front of the ear, so turn one over so you have a left and right ear. Lightly stuff each ear, then back stitch on the line you just drew using three strands of Baby Pink (818).
9. Lay the embroidered head/body shape on the work surface, right side up. Put the ears on top of it, matching the two dots on the ear tab with those marked on the head. Then lay the other head/body shape on top, right side down, being careful not to move the ears. Pin the layers together and sew around them using a 6mm (¼in) seam allowance, leaving the bottom edge open. Turn it right side out.
10. Stuff the head/body firmly with fibre fill using a stuffing tool or the blunt end of a chopstick to about 2.5cm (1in) from the opening.
11. Stuff the arms firmly with fibre fill to the stuffing line indicated on the pattern, then stitch across the lines to close them. Leave the remainder of the arms unstuffed. Stuff the legs in the same manner.
12. Place the top edges of the legs in the opening at the bottom of the body, with the toes pointing outwards. Ladder stitch the legs in position by stitching from the outer edges of the body across each leg using the strong thread. Leave the gap between the legs open and continue to stuff the body cavity until it is very firm. Then slip stitch the opening closed.
13. Turn the raw edges of the arms in 5mm (¼in) and ladder stitch them to the sides of the body where indicated on the pattern using the strong thread.
Clothing
Overalls
14. Trace the overalls front including the bib extension, the back to the dotted waistline and braces twice onto a single layer of the green holly print fabric. Cut the shapes out 6mm (¼in) outside the lines.
15. Trace the pocket front and lining shapes onto the red star print fabric and cut them out 6mm (¼in) outside the lines.
16. Cut a rectangle 2 x 4in from a scrap of beige homespun. Lay it over the pocket printed on the pattern sheet and trace elfred onto the centre of it. Back stitch the letters in Black (310), then trim the rectangle to 1⅜ x 3½in with the stitching centred. Join the rectangle to the pocket front, right sides together, so it finishes the same size as the lining.
17. Trace the appliqué star shape onto the paper side of the fusible web with the pencil. Cut it out roughly; do not cut on the pencil line yet.
18. Fuse the shape to the wrong side of the mustard check print fabric and cut it out carefully on the pencil line. Peel the backing paper off and fuse it in place on the red star print pocket front, referring to the photograph as a guide. Blanket stitch around it with three strands of Dark Straw (3820).
19. Sew the pocket front and lining right sides together around all the edges, leaving an opening along one side for turning. Trim the seams and turn the pocket right side out through the opening. Turn the raw edges of the opening in and press it flat. Top stitch the pocket in place on the bib front, leaving the upper edge unstitched and referring to the photograph as a guide. The opening is sewn closed at the same time.
20. Fold the bib section of the overalls where indicated on the pattern, right sides together and sew along the side edges. Turn the bib right side out, press all the waist edges under ¼in and sew close to the folds.
21. From the green mini check print fabric, cut:Four rectangles, 2½ x 4½in (pants cuffs)Two rectangles, 2½ x 4in (shirt cuffs).
22. Fold the pant cuffs in half, wrong sides together and long edges matching and press them. Match the raw edges of the cuffs with the lower edge of each pants leg and sew them in place. Press the cuffs away from the legs.
23. Match the two overall shapes, right sides together, and sew the side seams. Then sew up and down the inside leg. Turn the overalls right side out.
24. With right sides facing, sew the braces shapes together around all the edges, leaving a 3in opening for turning. Turn them right side out and slip stitch the opening closed. Press them flat.
Shirt
25. Fold the cream star print fabric in half both ways, right sides together, and trace the shirt once on the folds. Ensure you have a fold at the shoulder and centre front. Alternatively, trace out a full-size pattern and put it on the shoulder fold only. Cut it out adding 6mm (¼in) seam allowance.
26. Fold the shirt cuffs in half, wrong sides together and long edges matching. Pin the raw edges of the cuffs to the ends of each arm, right sides together, and sew them in place. Press the cuffs away from the sleeves.
27. Pin the shirt front and back together with right sides facing and cuff edges even and sew from the wrist to the underarm and down the side of the shirt to the hem on each side. Turn the shirt right side out and press it.
28. Make a cut about 3in long in the middle of the shoulder fold for the neck and cut a small slit from the neck down the centre back to fit it over Elfreds head.
29. Trim the hem of the shirt with pinking shears. (It is covered by the overalls.) Put the shirt on Elfred and work a few small stitches with strong thread on each side of the neck to hold it in place. 30. Slip the overalls on Elfred. Join the braces to the overalls, sewing two 10mm (⅜in) burgundy buttons on the front bib and the remaining one at the centre back waistline.
Collar
31. Trace the collar onto the burgundy felt and cut it out on the traced line. Sew a 3mm (⅛in) gold bead at the tip of each collar point. Work running stitch along the top straight edge where shown on the pattern, leaving long thread tails at each end.
32. Put the collar around Elfreds neck with the opening at the back. Pull up the threads to gather it tightly around his neck and tie them off securely. Hat
33. Measure the circumference of Elfreds head just above the ears and compare it with the width of the hat pattern at the bottom. The head can vary in size, depending on how firmly it stuffed and the fabric used. Adjust the hat if needed to match the head size and trace the pattern onto a single layer of the green holly print fabric. Cut it out 5mm (¼in) outside the traced line.
34. From the red star print fabric, cut:One strip, 1½ x 9½in for the hat trim or the adjusted length.
35. Fold the trim in half, wrong sides together and long edges matching and press it. Sew it to the lower edge of the hat shape with right sides facing and press the trim away from the hat.
36. Fold the hat shape in half right sides together and long edges matching and sew the seam to form a cone. Turn it right side out and push the tip out gently. Sew a 12mm (½in) gold bell to the point of the hat.
Boots
37. Paint the boots according to the markings on the pattern using Christmas Red. Allowing it to dry thoroughly each time, give them a second coat. Then paint two coats of PVA glue over the boots, leaving them to dry between coats.
38. Using the tapestry needle, make two parallel lines of four holes in the front part of each boot. Using Ecru and starting at the top, pass the needle on an angle from hole to hole in a zigzag pattern down and up again until all holes are stitched. Tie a bow where the shoelaces end.
39. Trace two boot cuffs onto the burgundy felt and cut them out on the traced lines. Sew a 3mm (⅛in) gold bead at the tip of each point. Work running stitch along the straight edge where shown, leaving long thread tails at each end. Wrap them around the legs at the top of the painted area, pull up the threads to fit snugly and tie them together securely. Add a dot of hot glue under the cuffs to keep them in place.
40. Sew a 12mm (½in) gold bell to the tip of each boot.
Finishing
41. Unravel the hair and hot glue pieces in place on the top and sides of the head, referring to the photograph as a guide.
42. Put the hat on Elfreds head and when you are happy with the position, slip stitch or hot glue it to his head.
43. Using the cosmetic rouge and brush, add some blusher to Elfreds cheeks, nose and ears, referring to the photograph as a guide. Draw a dotted line around the cheek circles with a pink lip pencil.
For more information on other quirky designs by Jenny Stephens of Jennabelle Designs, write to 17 Fairway View, Catalina NSW 2536, ph: (02) 4472 9042 or 0414 226 998 or email: adjen@shoal.net.au