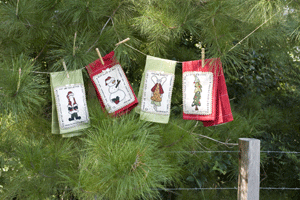
Add a touch of festive fare, and a little sparkle, to your kitchen this Christmas time with these fun tea towels designed especially for Homespun by Anna Jarman of Bumble Bee Designs. Simple appliqué and embroidery will delight those looking for quick gifts to make and with a sparkly ricrac and satin ribbon for embellishment, these projects will be loved by one and all.
Materials
Four waffle tea towels in Christmas colours
25cm (¼yd) calico (appliqué background)
Scraps of assorted print and plain fabrics in burgundy, gold, green, white, orange, burgundy, brown and black (appliqué)
DMC Perlé No 8 Cotton in Black (310)
DMC Stranded Embroidery Cotton in Blanc, Medium Light Topaz (725), Very Light Topaz (727) and Medium Garnet (815)
Embroidery needle
3.6m (4yd) of 12mm (½in) wide white and gold ricrac
1.1m (1¼yd) of 7mm (¼in) wide cream satin ribbon
Double-sided fusible web
Baking paper. Anna used the Gladbake brand.
Parisian essence (or gravy browning/kitchen bouquet) and spray bottle
Hot glue gun and glue sticks
2B pencil
Rotary cutter, ruler and mat
Sewing machine and general sewing supplies
Finished size of appliqué panels: 17 x 23cm (6¾ x 9in)
Stitches used: Back stitch, blanket stitch, buttonhole (pinwheel) stitch, cross stitch, French knot, running stitch, straight stitch
Note: Please read all instructions before commencing the project. Careful and accurate cutting and sewing is essential to ensure success with this project. A seam allowance of ¼in is included throughout. It is recommended that fabrics be 100% cotton, pre-washed and well ironed. Requirements are based on fabric 112cm (44in) wide.
Preparation and cutting
1. Mix a solution of two cups of warm water with ½ cup of Parisian essence (or gravy browning/kitchen bouquet) in a spray bottle. Test the mixture on a scrap piece of calico you can add more essence if you want a darker colour or, alternatively, add more water for a lighter look. But remember the colour will be lighter when the fabric is dry. Spray the mixture all over the calico and leave the fabric to dry completely.
2. From the dyed calico, cut:
Four rectangles, 6½ x 9¾ in (appliqué background).
Anna’s Tip
To avoid making a mistake when arranging your appliqué design, you can use a sheet of baking paper, such as Gladbake, to assemble the various shapes of your appliqué. Peel the backing paper off all but the lower-most shape. Position the shapes appropriately and, when you are happy with the design, press them firmly with an iron. You will now be able to transfer the complete design in one piece to your calico rectangle. You will just need to remove the backing paper from the lower-most shape before fusing the design in place.
Embroidery and appliqué
3. Find the centre of your background fabric by folding the fabric in half and then half again. Find the centre of the design on the pattern sheet and match it to your fabric centre. Using the fabric marking pen, lightly trace the wording onto each of the calico rectangles. A light source such as a window, light box or glass-topped table with a desk lamp placed underneath will help to make the design more visible through the fabric.
4. Work back stitch for the wording and the star using Black (310). Use the same thread to work running stitch for the line at the end of the wording (if relevant).
5. Print out the appliqué shapes (see at the end of these instructions) and using the pencil, trace the shapes onto the paper side of the fusible web, leaving at least ½in between them. The shapes have been printed in reverse to assist you. Cut all of the shapes out roughly do not cut on the pencil line yet. Fuse the shapes to the wrong side of the fabrics that you have selected for them. Cut out each shape carefully on the pencil line.
6. Peel the backing paper off the appliqué shapes and, using the pattern sheet and photograph as a guide, place the shapes on one of the 6½ x 9¾in calico rectangles, overlapping them where required, or follow Annas tip and assemble the design on baking paper before moving it to the calico. When you are happy with the arrangement, fuse the shapes into place. Work blanket stitch around all raw edges of the appliqué using Black (310) except where noted in step 7. Work French knots for the eyes on the snowman, angel and Santa.
7. On the Santa design, work running stitch close to the raw edges of the beard and moustache. Using two strands of thread, work French knots in Very Light Topaz (727) for the jacket buttons and work straight stitch and cross stitch for the belt buckle. The hat pompom is worked in buttonhole (pinwheel) stitch using the same thread.
8. On the Christmas tree tea towel, work buttonhole (pinwheel) stitch for the decorations using a combination of Blanc, Medium Light Topaz (725) and Medium Garnet (815). The tinsel is worked in back stitches using two strands of Very Light Topaz (727).
Assembly
9. Cut four rectangles from the fusible web a tiny bit smaller than the calico rectangles. Fuse a web rectangle to the back of each calico rectangle. Peel the backing paper off the rectangles and place them in the bottom centre of each tea towel. Fuse them in place firmly.
10. Cut four 34in lengths of ricrac. Pin a length around the raw edge of each of the appliquéd rectangles, starting in the top centre of each panel. The centre of the ricrac should sit just inside the raw edge of the appliquéd rectangles. Using thread to match the ricrac in the top of your machine and to match the tea towel in the bobbin, sew through the centre of the ricrac, catching the edge of the calico panel at the same time.
11. Cut four 10in lengths of ribbon and tie a bow in each length. Referring to the photograph as a guide, glue the bow in the centre of the appliquéd rectangle, covering the join where the two ends of the ricrac meet.
For more information on other fabulous designs by Anna Jarman of Bumble Bee Designs, write to 30 Roebourne Avenue, Hadspen Tas 7290, phone (03) 6393 6186 or email bumblebeedesigns@gmail.com


