Download Go Green Mug Carrier Instructions here.
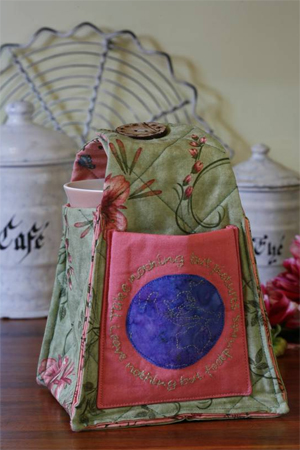
Saving the planet is not an easy task but it is one that we can all contribute to to make the world not only a better place but a safer one. Paula Storm of Sew Little Fabric is doing her best to educate her friends and family about being environmentally conscious with her project designed especially for our Homespun website visitors. Featuring a simple quote stating Take nothing but pictures, Leave nothing but footprints, Paula’s handy mug carrier will be a delightful addition to your craft basket when heading to your next sewing get-together, attending a family picnic or whilst supporting your favourite environmental cause.
Materials
Fat quarter green lily print fabric (outer bag)
Fat quarter pink butterfly print fabric (lining)
Fat eighth pink homespun (pocket)
8cm (3in) square of blue batik print fabric (stitchery background)
DMC Linen Embroidery Floss in Khaki Green (L3012)
Embroidery needle
One 34mm (1¼in) recycled coconut button
30cm (⅜yd) fusible batting such as Pellon or Vilene
Double-sided fusible web
Fine Pigma pen in brown and 2B pencil
Water-erasable fabric marking pen or tailor’s chalk
Rotary cutter, ruler and cutting mat
Sewing machine with ¼in foot
General sewing supplies
A copy of Homespun Vol 11 No 5
Finished size: 14.5 x 24.5cm (5¾ x 9⅝in)
Stitches used: Back stitch, running stitch, straight stitch
Note: Please read all instructions before commencing the project. Careful and accurate cutting and sewing are essential to ensure success with this project. A seam allowance of ¼in is included throughout. It is recommended that fabrics be 100% cotton, pre-washed and well ironed. Requirements are based on fabric 112cm (44in) wide. All embroidery is worked with two strands of thread unless otherwise stated.
Cutting
1. From each of the green lily print and pink butterfly print fabrics, cut:
Two rectangles, 6½ x 10⅜in (bag front and bag)
One rectangle, 5½ x 16¾in (gusset).
2. From the pink homespun, cut:
Two rectangles, 4½ x 5in (pocket).
3. From the fusible batting, cut:
Two rectangles, 6½ x 10⅜in
One strip, 5½ x 16¾in
One rectangle, 4½ x 5in.
Embroidery
4. Using the Pigma pen, lightly trace the wording design printed on the pattern sheet of Homespun Vol 11 No 5 onto one of the 4½ x 5in pink homespun rectangles. A light source such as a window, light box or glass-topped table with a desk lamp placed underneath will help to make the design more visible through the fabric.
5. Using the pencil, trace the globe shape from the pattern sheet onto the paper side of the fusible web. Cut out the shape roughly do not cut on the pencil line yet. Fuse it to the wrong side of the blue batik print fabric . Cut the shape out carefully on the pencil line.
6. Trace the map onto the blue batik print circle in the same manner as you did in step 4.
7. Peel the backing paper off the fusible web and referring to the photograph as a guide, centre the globe shape on the pink homespun rectangle in the middle of the traced wording. Once you are happy with its position, fuse it in place.
8. Shorten the stitch length on your sewing machine to around 1.5 and work two rows of stitching around the outer edge of the globe using thread to match the blue fabric, to appliqué it with a raw edge.
9. Fuse the matching batting rectangle to the wrong side of the appliquéd homespun rectangle. Using two strands of Khaki Green (L3012), work back stitch for the wording, adding a straight stitch above the i’s’. Work the map in running stitch using one strand of the same thread.
Assembly
10. Match the appliquéd rectangle and the remaining 4½ x 5in pink homespun rectangle, right sides together. Sew around all four edges, leaving a 2in opening in the bottom for turning. Turn the pocket right side out and press.
11. On the 6½ x 10⅜in green lily print rectangles, make a mark 2in in from each top corner. Using your ruler, trim the fabric from the mark you made to the bottom corners to create a trapezoid. See diagram 1.
12. Repeat step 11 with the lining and batting rectangles.
13. Fuse the batting shapes for the bag front, back and gusset to the wrong side of the equivalent shapes cut from pink butterfly print fabric. Put the gusset to one side.
14. Lay a 6½ x 10⅜in green lily print bag front/back shape on a flat surface, right side facing up. Place a matching pink butterfly print shape on top, right side facing down. Sew around the outer edge, leaving a small opening for turning. Repeat with the remaining outer bag and lining shapes. Turn each shape right side out and slip stitch the openings closed.
15. Quilt as desired. Paula marked quilting lines on the lining side of the bag shapes using a fabric marking pen. She quilted her first line at a 45-degree angle to the bottom edge, then quilted parallel lines 2in apart.
16. Referring to the photograph as a guide, pin the appliquéd pocket approximately ½in up from the bottom edge on the front of your outer bag shape. As you insert the pins, push the pocket edges towards the centre a little so that the pocket arches a little rather than sits flat against the front of the outer bag. This will make it easier to put things in it. Top stitch close to the outer edge around three sides, leaving the top edge open. You will be stitching the opening left in one edge of your pocket closed at the same time as you are attaching the pocket to the front of her bag.
17. Mark the centre point on each of the long edges of the gusset. Mark the centre point on the bottom edge of each of the outer bag shapes.
18. Pin the gusset to one of the bag shapes with the green lily print fabrics together. Start by pinning the centre point on one long edge of the gusset to the centre point in the bottom edge of the bag. Ease the gusset along the bottom edge, around the corners and up each side of the bag shape. A little pleat will form in the gusset at the corner.
19. Top stitch the gusset to the bag ¼in from the edges.
20. Repeat steps 18 and 19 to join the gusset to the other bag shape.
21. On the front of the bag, measure ½in down from the centre of the top edge and work a vertical buttonhole from this point down in a size to match your chosen button. Line up the button on the back of the bag and sew the button in place.
For more information on other charming designs by Paula Storm of Sew Little Fabric, phone (02) 4472 2471, email: paula.storm@gmail.com or log on to www.sewlittlefabric.blogspot.com