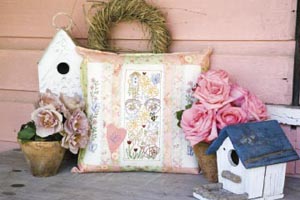
Bronwyn Hayes of Red Brolly Stitcheries has created a pretty version of her gorgeous cushion featured in Homespun Vol 8 No 5. Worked in a softer palette of threads, the stitchery is simply divine with its mix of daffodils, pansies, roses and a flurry of birds, bees, butterflies and even a bunny. Its perfect for adding some springtime blooms to your home as the weather gets nippier.
Stichery Guide Table 1
Stichery Guide Table 2
Materials
* 25cm (1/4yd) cream linen (stitchery background)
* Fat eighth pink floral print fabric
* 10cm (1/8yd) dusky green small floral print fabric
* 15cm (5in) square of dusky green medium floral print fabric
* 10cm (1/8yd) cream floral print fabric
* Scrap of pink homespun (heart appliqué)
* Fat quarter backing fabric
* DMC Stranded Embroidery Cotton in Very Dark Shell Pink (221), Light Shell Pink (223), Black (310), Dark Hazelnut Brown (420), Very Dark Topaz (781), Medium Cornflower Blue (793), Medium Antique Blue (931), Hunter Green (3346) and Dark Antique Violet (3740)
* Embroidery needle
* 16cm (6in) embroidery hoop (optional)
* 11 1/4 x 16 1/4 in fusible interfacing
* 2m (2 1/4yd) of 6mm (1/4in) wide light green ricrac
* 1.2m (1 3/8yd) of 12mm (1/2in) wide pink satin ribbon (backing closure)
* Size 16 (40cm/16in square) cushion insert
* Template plastic and permanent marking pen
* Water-erasable fabric marking pen
* Rotary cutter, ruler and mat
* Matching machine sewing thread
* Sewing machine and general sewing supplies
Finished size: 40cm (15 3/4in) square
Stitches used: Back stitch, colonial knot, detached chain (lazy daisy) stitch, running stitch, satin stitch, straight stitch
Note: Please read all instructions before commencing the project. Careful and accurate cutting and sewing is essential to ensure success with this project. A seam allowance of 1/4in is used throughout and is included in the cutting instructions. It is recommended that fabrics other than the linen for the stitchery background be 100% cotton. Pre-wash and iron all fabrics. Requirements are based on fabric 112cm (44in) wide. All embroidery is worked with two strands of thread unless otherwise stated.
Preparation and cutting
1. To make a heart template, trace the heart (which can be found here) onto template plastic using the permanent marking pen. Cut the shape out on the line.
2. Place the template onto the dusky blue floral print fabric and trace 1/4in outside the shape. Cut it out on the traced line and put aside.
3. From the pink floral print fabric, cut:
* Two 1 1/2 x 11 1/4in strips (B)
* Four 3 x 6 1/4in rectangles (G).
4. From the cream floral print fabric, cut:
* Two 1 1/2 x 11 1/4in strips (C).
5. From the dusky green small floral print fabric, cut:
* Two 2 1/4 x 11 1/4in strips (E).
6. From the dusky green medium floral print fabric, cut:
* Two 3 x 4 3/4in rectangles (F).
7. From the backing fabric, cut:
* Two 10 1/2 x 16 1/4in rectangles.
Embroidery
8. On the cream linen, lightly trace one centre panel stitchery and two border stitcheries from the pattern sheet in Vol 8 No 5 (#49) of Homespun, using the fabric marking pen. Leave at least 3in between stitcheries. A light source such as a window, light box or glass-topped table with a desk lamp placed underneath will help to make the design more visible through the fabric. Trace a butterfly onto the pink heart appliqué in the same manner.
9. Place your work in the embroidery hoop, if desired, to keep it flat and prevent it puckering. Stitch the design following the stitchery guide below. Work the butterfly on the heart appliqué in the same manner as the border stitchery butterfly. Once you have finished, remove the embroidery from the hoop and press lightly so as not to flatten the stitches.
Assembling the cushion
10. Cut the light green ricrac into six 12in lengths and sew one length to each long edge of the centre panel stitchery. Trim the ends even with the fabric.
11. In a similar manner, sew the other lengths to one long edge of each of the B and C strips. Trim the ends even with the fabric.
12. Referring to diagram 1 from the magazine (page 50) as a guide, sew a B strip to the left and right edges of the centre embroidery panel (A). Then sew a C strip to the left and right edges of this unit. Check that the edges of the B and C strips that have the ricrac sewn to them are closer to the centre panel before stitching. Then sew the border embroidery panels (D) to the left and right edges of this unit; check that the embroidery is the right way up before stitching. Finally, sew an E strip to the left and right edges of this unit to complete the centre front panel. Press all seams towards the centre panel.
13. Sew a G rectangle to the left and right edges of each F rectangle to yield two 3 x 16 1/4in strips. Sew them to the top and bottom edges of the centre panel, carefully matching seams. Press.
14. Fuse the interfacing to the wrong side of the cushion front and trim the edges. Needleturn appliqué the heart in place, referring to the photograph as a guide.
Finishing
15. On each of the two backing rectangles, fold over and press a 1in hem along one long edge. Fold it over a second time and press. Machine top stitch the hems in place.
16. Lay one backing rectangle on a table right side up. Place the second backing rectangle on top, overlapping the hemmed long seams and keeping the raw edges even. See diagram 2 in the magazine (page 50).
17. Pin the two rectangles in place. The pinned back section should now measure 16 1/4in square. Adjust the rectangles until your backing is this measurement. Machine tack along the top and bottom edges.
18. With right sides together, pin the cushion front to the back. Sew all around the outer edge, turn right side out and press.
19. Machine top stitch around the entire front of the cushion, 1/4in in from the edge.
20. Cut the ribbon into four equal lengths. Hand sew the ribbon ties in place on the back of the cushion, 5 1/2in down from the top and bottom edges of the overlap and the top and bottom edges of the underlap. See diagram 3 in the magazine (page 50).
21. Place the cushion insert inside and tie the opening closed with the ribbon ties.
For more information on other fabulous designs by Bronwyn Hayes of Red Brolly Stitcheries, write to PO Box 756, Mawson ACT 2607, phone (02) 6286 6983 or email: thebronwyn_hayes@hotmail.com If you missed out on a copy of Homespun Vol 8 No 5 and you need the pattern sheets to create this project, then ring 1300 303 414 to order a copy now.


