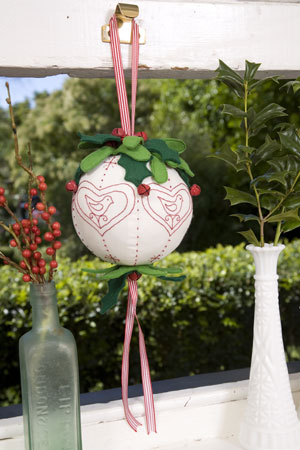
English artisans Emma Corbett and Lisa Harper of Buttonberry fame were so delighted with the kissing ball they created for Homespun Vol 9 No 7 that they couldnt stop at just one. With some red thread, some assorted green felts and a bag of red jingle bells, this talented duo created a kissing ball with a true folk art feel as a special bonus for visitors to Homespuns website.
Materials
Fat eighth white homespun (stitchery background)
30cm (12in) square each of forest green and emerald green wool felt (holly leaves)
DMC Stranded Embroidery Cotton in Garnet (816)
Embroidery needle
1.3m (1 1/2yd) of 10mm (#/8in) wide red stripe ribbon
21, 12mm (1/2in) red jingle bells
30cm (#/8yd) lightweight fusible interfacing (stitchery background)
Polyester fibre fill
Chopstick or stuffing tool
Fabric glue and silver glitter (optional)
Thin cardboard and 2B pencil
Water-erasable fabric marking pen
Sewing machine and 1/4in foot
General sewing supplies
A copy of Homespun Vol 9 No 7
Finished size: 16cm (6 1/4in) diameter; 44cm (17in) hanging
Stitches used: Back stitch, French knot, running stitch
Note: Please read all instructions before commencing the project. Careful and accurate cutting and sewing is essential to ensure success with this project. A seam allowance of 1/4in is included throughout, except for the leaves, which are stitched on the traced line. It is recommended that fabrics, except for the wool felt, be 100% cotton, pre-washed and ironed. Requirements are based on fabric and interfacing 112cm (44in) wide. Use a smaller than normal stitch on your sewing machine for stitching the ball as this makes the seams stronger and smoother. All embroidery is worked with two strands of thread.
Preparation and cutting
1. Print out the stitchery design and pattern. You will also need to access the segment and the mistletoe leaf patterns printed on the pattern sheet for Homespun Vol 9 No 7. Follow step 1 published in the instructions for the Kiss Me Tender project in Homespun Vol 9 No 7 to prepare templates.
2. Trace five segments onto the white homespun using the fabric marking pen. Cut them out on the traced lines.
3. Lightly trace the stitchery design onto each of the segments using the fabric marking pen. A light source such as a window, light box or glass-topped table with a desk lamp placed underneath will help to make the design more visible through the fabric. Fuse the interfacing to the wrong side of each of the traced segments.
Embroidery
4. Work the embroidery design through the fabric and interfacing. Work back stitch for the bird outline, wing, hearts, stand and two arms of the star using Garnet (816). Using the same thread, work the remaining two arms of the star in running stitch. Still using the same thread, work French knots for the birds eye, the spots above and underneath the hearts and the tips of the back stitched star.
5. Follow step 5 in the instructions published in the magazine.
Assembly
6. Place two white segments right sides together and sew along one edge, starting 1/4in from the top point and finishing !/4in from the bottom point. Repeat with the remaining segments, leaving a 2in opening on the last seam for turning. Turn the ball right side out.
7. Follow step 7 in the instructions published in the magazine.
8. Work French knots in Garnet (816) over the seam lines around the ball.
Embellishing
9. Fold the forest green wool felt in half and trace around the holly leaf template 12 times. Sew on the traced lines. Sew a centre seam from the base of the leaf about two-thirds down its length. Cut out the leaves 1/8in outside the stitching.
10. Fold the emerald green wool felt in half and trace around the mistletoe leaf template nine times. Sew on the traced lines and cut the leaves out 1/8in outside the stitching.
11. Follow steps 10, 12 and 13 published in the magazine.
12. Sew the red jingle bells in place, referring to the photograph as a guide.
For more information on other charming designs by Emma Corbett and Lisa Harper of Buttonberry, write to 9 Hereford Drive, Claydon, Ipswich, Suffolk IP6 0BF UK, email thegirls@buttonberry.com or visit the website at www.buttonberry.com