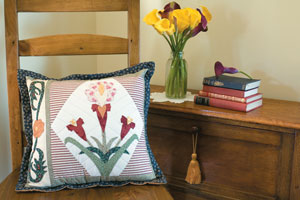
Clare Mooney, editor of Homespuns sister magazine Quilters Companion, was out on a photography shoot for the magazine when she noticed a beautiful plaster ceiling rosette in the house she was visiting in Glebe in inner Sydney. Inspired by the design, Clare pulled out her pen and paper and sketched a bunch of lilies and a rose vine. The end result is this delightful cushion designed especially for Homespun website visitors. Selecting such gorgeous fabrics in rich burgundies and golds, as well as deep greens and blues, has ensured this design is truly keeping with her muse.
Materials
35cm (½yd) cream tone-on-tone print fabric (appliqué background) 10cm (1/8yd) yellow check print fabric (appliqué background)
Scraps of various shades of green print fabrics (ranging from light green to forest green) (leaves & stems)
Scraps of various shades of yellow print fabrics (ranging from yellow to gold) (flowers)
Scrap of dark red tone-on-tone floral print fabric (flowers)
Scraps of pink floral print fabric (flowers)
10cm (1/8yd) light green spot print fabric (outer border and sashing)
15cm (¼yd) red and cream stripe print fabric (centre panel)
10cm (1/8yd) navy blue floral print fabric (flange)
50cm (5/8yd) quilters muslin
30cm (3/8yd) backing fabric
Batting at least 50cm (19½in) square
One 28cm (11in) zipper
One 41cm (16in) square cushion insert
No 12 appliqué needles (sharps)
Pencil and tailors chalk
Template plastic and fine permanent marking pen
Rotary cutter, ruler and mat
Matching cotton threads for appliqué
Matching quilting thread
Sewing machine, ¼in foot and zipper foot
General sewing supplies
Finished size: 42 x 43cm (16½ x 17in)
Note: Please read all instructions before commencing the project. Careful and accurate cutting and sewing is essential to ensure success with this project. Use a 6mm (¼in) seam allowance unless otherwise stated. It is recommended that fabrics be 100% cotton, pre-washed and ironed. Requirements are based on fabric 112cm (44in) wide. Instructions are provided for needleturn appliqué and you will need to add a seam allowance when cutting out the appliqué shapes from fabric. Adapt the instructions to suit your preferred appliqué method.
Cutting
1. From the cream tone-on-tone print fabric, cut:
One rectangle, 11½ x 12in.
2. From the yellow check print fabric, cut:
One strip, 3 x 13½in.
3. From the light green spot print fabric, cut:
Two strips, 2 x 11½in
Three strips, 1 x 15in
Two rectangles, 1¼ x 3in.
4. From the navy blue floral print fabric, cut:
Two strips, 1½ x 15½in
Two strips, 1½ x 17in.
5. From the quilters muslin, cut:
One rectangle, 17½ x 18in.
6. From the backing fabric, cut:
Two rectangles, 9½ x 17½in.
Preparation
7. Make templates for each of the appliqué shapes and the corner triangle by tracing them from the pattern sheet available in Homespun Vol 9 No 6 onto the template plastic using the permanent marking pen. Cut them out carefully on the line.
8. Trace around the corner triangle template twice on the red and cream stripe print fabric, so that the stripes will run in the same direction once they are pieced into the cushion. Then flip the template over to reverse it and trace it twice more. Cut the triangles out on the lines.
9. Trace the required number of leaves, stems and flowers from your chosen fabrics, leaving at least ½in between shapes. Cut the shapes out 3/16 to ¼in outside the traced lines. As this turn under allowance doesnt need to be precise, you can cut out the shapes by eye.
10. Place the rectangle of cream fabric cut in step 1 wrong side up on your work surface. Position the corner triangle template in each corner of the rectangle and lightly trace the long diagonal edge. See Diagram 1
11. In each corner, draw another diagonal line, parallel to the first, exactly ½in closer to the corners. Cut the fabric on this line. See Diagram 2
12. Sew the striped corner triangles to the cream centre panel. Press the seams towards the triangles.
Centre panel appliqué
13. Fold the background square in half vertically and horizontally and press it lightly to crease. Place the fabric over the appliqué design printed on the pattern sheet available in Homespun Vol 9 No 6, match centres and lightly trace placement lines for the stems onto the background fabric using the chalk.
14. Pin the appliqué shapes in position, beginning with the two smallest leaves and the stems for the side flowers, as these are the lowest layer of the appliqué. Stitch each piece in place using the needleturn method, using the tip and side of the needle to roll the edge of the fabric under to the drawn line and blind stitching it in place. Trim the excess fabric where necessary. When working around the inside curves, you may find it helps to clip the seam allowance up to, but not through, the stitching. See Diagram 3. When working around outside curves, cut out small notches of fabric out of the seam allowance to make the fabric turn under more smoothly. See Diagram 4.
15. Continue to appliqué the remaining leaves and flowers in place, overlapping them where required and referring to the pattern and photograph as a guide to the layers and the position of each shape.
Assembly
16. Sew a 2 x 11½in light green spot print strip to the top and bottom edges of the centre block. Press. Sew a 1 x 15in light green spot print strip to the left and right edges of the centre block. Press.
17. Sew a 1¼ x 3in light green spot print rectangle to both short edges of the 3 x 13½in yellow check print strip. Press seams towards the green fabric.
18. Sew the assembled yellow and green strip to the left edge of the centre block. Press. Sew the remaining 1 x 15in light green spot print strip to the left edge of the yellow check strip.
19. Sew a 1½ x 15½in navy blue floral print strip to the top and bottom edges of the cushion front. Press. Then sew a 1½ x 17in navy blue floral print strip to the left and right edges of the cushion front.
20. To complete the appliqué on the left panel of the cushion, fold the yellow check fabric panel in half lengthwise and finger press to crease. Position the two green leaves in place, referring to the photograph as a guide. Secure them with pins, then needleturn appliqué them in place. Appliqué the flower and flower centre in place in the same manner.
Quilting
21. Using the pencil, lightly rule some diagonal lines on the background of the centre appliqué. Clare ruled lines to make it appear that the quilting was radiating from the centre stem. You may like to quilt yours with a simple 1in grid pattern. Smooth out the quilters muslin on a table with right side down and secure it with masking tape. Lay the batting on top, ensuring it is smooth and free from wrinkles. After pressing the cushion top, lay it on top of the batting and baste or pin the three layers together.
22. Machine quilt the three layers, avoiding the appliquéd shapes. Clare also echo quilted around the leaf and flower design on the side panel and quilted on some of the lines printed on the red and cream stripe print fabric. Trim the muslin and batting level with the edge of the cushion.
Finishing
23. Match the two cushion backing rectangles, right sides together. Using a 1in seam allowance, join the rectangles by stitching for 3¼in at the top and bottom of one long edge, leaving the centre 1in unstitched for the zipper. See Diagram 5. Back stitch at both ends of these short seams to reinforce them. Press the seam open.
24. Turn under the raw edges of the opening in the seam by 1in and press to fold. Place the zipper under the opening, with one folded edge next to the zipper teeth. With the zipper foot fitted to the machine, stitch close to the fold next to the zipper teeth. Pin the remaining folded edge over the zipper teeth to make the other side and stitch it in place on the top. Secure the ends of all the stitching.
25. Open the zipper and pin the cushion back to the cushion front, right sides together. Stitch around all four edges using a ¼in seam. Turn the cushion cover right side out and press it gently.
26. Sew a row of stitching in the ditch between the navy blue fabric and green spotted border strips to create a flange. Clare sewed this in the same colour thread as she used for the quilting to make it appear that it was another line of quilting.
27. Put the cushion insert inside your cushion cover and zip it up to finish.