Download PDF with full instructions and images here.
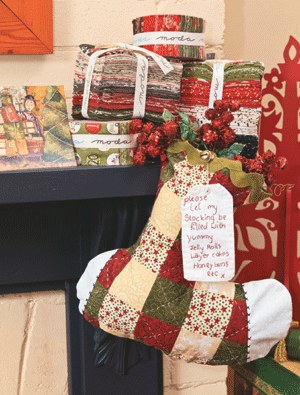
Put your order in with Santa and make your wishes as you hang this charming stocking in the hopes that it will be overflowing with craft goodies the next morning. Designed by Robyn Welsh of Country Hart Designs, this rather large “sock” is the perfect gift for any crafty friend. So why not get busy and create a few for your fellow bloggers or even your quilting companions. They are sure to appreciate it come Christmas morning when it undoubtedly will be filled with a variety of fabric precuts we all love to receive.
Materials
Fat quarter cream tone-on-tone spot print fabric (heel, toe and tag)
10cm (⅛yd) each of a minimum of six assorted festive tone-on-tone and print fabrics in cream, burgundy and dark green (outer stocking). Robyn used a variety of prints including stars, swirls, leaves and snowflakes
40cm (½yd) dark green clover print fabric (lining)
40cm (½yd) fusible batting such as Pellon
DMC Stranded Embroidery Cotton in Black (310), Medium Garnet (815) and to match the ricrac
DMC Perlé No 8 Cotton in Ecru
Embroidery needle
60cm (25in) of 4cm (1½in) wide olive green ricrac
15mm (⅝in) gold bell
Pigma pen in brown
Water-erasable fabric-marking pen or pencil
Template plastic and permanent-marking pen
Masking tape (optional)
Rotary cutter, ruler and mat
Sewing machine with ¼in foot
General sewing supplies
Copy of Homespun Vol 12 No 7
Finished size: 34.5 x 37cm (13⅝8 x 14½in)
Stitches used: Back stitch, blanket (pinwheel) stitch, cross stitch, French knot, herringbone stitch, running stitch
Note: Please read all instructions before commencing the project. Careful and accurate cutting and sewing are essential to ensure success with this project. A seam allowance of ¼in is used throughout. It is recommended that fabrics be 100% cotton, pre-washed and well ironed. Requirements are based on fabric and batting 112cm (44in) wide.
Preparation and cutting
1. To make templates for each of the shapes printed on the Homespun Vol 12 No 7 pattern sheet, trace them onto template plastic using the permanent-marking pen. Cut them out on the traced lines. To use them, place the template on the right side of the fabric, trace around the shape with a fabric-marking pen or pencil, then cut the fabric on the traced line.
2. From the cream tone-on-tone spot print fabric, trace and cut:
One toe
One toe reversed
One heel
One heel reversed
Two wish tags.
3. From the assorted festive tone-on-tone and print fabrics, cut:
70 squares, 3in.
4. From the fusible batting, cut:
One wish tags
One rectangle, 18 x 25½in.
Assembly
5. Lay out your 70 tone-on-tone and print squares in seven rows of 10 squares each. Mix and match them until you have an array of colours and prints that you like.
6. Sew the squares in each row together, then sew the rows together, carefully matching seams.
7. Iron the rectangle of fusible batting to the wrong side of your patchwork. Using Ecru, work running stitch diagonally in each direction across each of the squares to quilt your patchwork panel. Robyn recommends working your stitches along the edge of a strip of masking tape to help you keep your lines straight without having to draw them on the fabric.
8. Place the stocking template on the wrong side of your pieced panel. Trace around the template; flip it over then trace around it to give you one stocking and one stocking reversed. Cut the two shapes out on the traced lines.
9. Pin and sew the heel to the stocking and the heel reversed to the stocking reversed. Press seams outwards. Repeat with the toe and toe reversed.
10. Using two strands of Black (310), work a row of primitive cross stitches along the seam between the toe and the stocking on each stocking. Repeat along the seam between the heel and the stocking.
11. Pin one of the stockings to the dark green clover print fabric. Use it as a pattern to cut a stocking shape from the green fabric. Turn the stocking over and use it as a pattern to cut a stocking reversed shape.
12. Pin the two outer stockings, right sides together; check that the seam lines at the toe and heel meet at the edges. Sew around the outer curved edge of the stocking, leaving the top straight edge open. Clip the curves and turn the stocking right side out.
13. Repeat step 12 with the two green stocking shapes for the lining, leaving a 3in opening in the back seam for turning. Leave the lining wrong side out.
14. Slip the outer stocking inside the lining stocking: the right sides of the outer stocking and the lining should be facing each other. Align the top edges and match the side seams. Pin, then sew around the top edge.
15. Turn the stocking right side out through the opening in the lining. Slip stitch the opening closed. Push the lining down into the stocking. Press.
16. Pin the olive green ricrac along the top edge of the stocking so that most of the upper curve sits above the top edge of the stocking. Using two strands of matching thread, sew the ricrac in place by working herringbone stitch across the ricrac just before the upward curve. See diagram 1.
Tag
17. Using the Pigma pen, lightly trace the stitchery design from the Homespun Vol 12 No 7 pattern sheet onto the right side of one of the wish tag shapes. A light source such as a window, light box or glass-topped table with a desk lamp placed underneath will help to make the design more visible through the fabric. Fuse the batting wish tag shape to the wrong side of this tag.
18. Using one strand of Medium Garnet (815), back stitch the wording on the wish tag, adding French knots above the “is” and a cross stitch at the end to represent the “kiss”.
19. Place the two wish tag shapes right sides together and sew around the outer edge, leaving a 1in opening in one side for turning. Turn the wish tag right side out and press.
20. Using Ecru, work running stitch around the outer edge to finish and to close the opening.
21. Mark the centre of the tag approximately 1cm (½in) down from the top. Snip a small cross through all layers approximately 5mm (¼in) long. Using Ecru, work blanket (pinwheel) stitch in a circle to create a small eyelet.
22. Cut a 20cm (8in) length of Ecru and thread it through the eyelet. Tie it off to create a hanger. Trim. Sew the bell to the front of your stocking, referring to the photograph as a guide, then slip the wish tag over the bell to hang it in place.
For more information on other charming designs by Robyn Welsh of Country Hart Designs, visit Shop 3/176 Ellen Street, Port Pirie SA 5540, phone (08) 8632 3172 or 0417 826 418 or log on to
www.countryhart.com.au or www.countryhartdesigns.blogspot.com
If you wish to find your nearest stockist of the gorgeous array of new festive fabrics from Moda including
Countdown to Christmas by Sweetwater, Grace by 3 Sisters or Fa la la la la by French General pictured on page 1, contact PK Fabrics. Ph: (02) 9557 2033, email: sales@pkfabrics.com.au or visit their website at www.pkfabrics.com.au